This chapter contains the following topics:
Printing Blanket Orders Report
Printing Release Purchase Orders
If you do not use blanket purchase orders, you may skip this chapter.
A blanket purchase order is used when you want to buy a large total quantity of an item(s) from a vendor, but don’t want it delivered all at once. Instead, the total quantity will be delivered in partial shipments over the course of several months or a year. These partial shipments are called releases. A release occurs when you notify the vendor, either verbally or in writing, that you now want delivery of part of the blanket order.
Use this selection to enter releases into the P/O module and to print release purchase orders to send to your vendors.
Releases are automatically numbered from one within each blanket purchase order.
Use this function to verify the status of a blanket purchase order: how many releases have been made, the release dates, the release quantities, etc. Summarized and detailed release information can be shown for each blanket purchase order within the selected range.
This report is used to determine which blanket orders are due for a new release.
The report does not include unposted purchase orders or unposted releases. You may choose to include closed blanket orders (provided they have not yet been purged).
See a sample Blanket Orders List in the Sample Reports appendix.
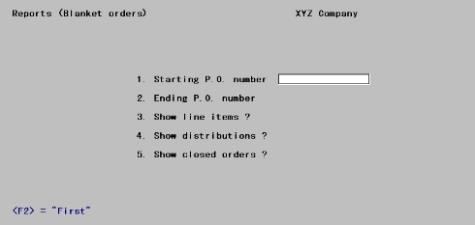
Select
Blanket orders from the Reports menu.
The following screen appears:
Enter the following information:
1. Starting P.O. number and
2. Ending P.O. number
Enter the range of blanket orders to show. Follow the screen instructions.
|
Format |
15 characters at each field |
|
Example |
Press <F2> at each field for First through Last |
3. Show line items ?
Answer N to show only the header information. A summary of the release information will be shown for each blanket purchase order in the range: the last release date, the number of releases so far, and the release interval.
Answer Y to also show the line item information. Detailed release information will be shown for each line item: the last release date and quantity, the total quantity released so far, the balance remaining to be released, and the quantity already received.
|
Format |
One letter, either Y or N. The default is Y. |
|
Example |
Press <Enter> for Y |
4. Show distributions ?
If you are not showing line items on the report, this field displays as N and may not be changed. Otherwise, answer Y if you wish to show the distributions for the line items shown.
|
Format |
One letter, either Y or N. The default is Y. |
|
Example |
Press <Enter> for Y. |
5. Show closed orders ?
A closed purchase order is one for which you have received everything that you expect to receive.
Answer N to show only open blanket orders. This shortens the report and allows you to concentrate on the purchase orders for which you expect to receive items.
Answer Y to show both open and closed blanket purchase orders. This is useful if you need to refer to a closed purchase order or compare a vendor’s open blanket purchase orders to his closed ones.
|
Format |
One letter, either Y or N. The default is Y. |
|
Example |
Press <Enter> for Y |
Field number to change ?
Make any needed changes. Upon pressing <Enter> with this field blank, the Blanket Orders List will print.
Use this function to either enter a new release transaction or change the last release transaction.
Only one unposted Releases entry at a time may exist for any given blanket order, but that entry may either be a new release or a change to the previous release.
If an entry does exist, it can be changed or deleted. Once it has been posted, the entry cannot be changed; however you can make another change to the same release.
| • | There is no limit to the number of changes you can make to the current release, provided you post each change before entering the next. |
| • | You can change a release whether or not any receivings have applied to that release. |
| • | You cannot delete a release once posted. |
| • | You cannot change any posted release other than the current one. For instance, if the current release is # 3, you can change Release # 3 or add Release # 4; either of these entries can themselves be modified until you choose to post them. However it is too late to make any changes to Release # 2. |
| • | A new release can be added even though an existing release is still open. This is not recommended procedure; but when it does happen, subsequent receivings are applied to the open releases in order of release number. The Receivings selection will expect the quantity of the next receiving to be the sum of all open releases. A lesser or greater quantity will be accepted, but only after a warning. |
Blanket purchase orders (usually) include a release interval and a first required date. Together these determine the date of each future release in advance, but this does not mean that releases are created automatically upon falling due. Instead:
| • | The first release of a blanket order occurs automatically when the order is posted (unless you have left First reqd date blank in the purchase order). |
| • | Thereafter, releases occur only when you Enter and Post them through this selection. |
| • | You can create a new release at any time, regardless of the stated starting date and interval. Both of these are optional. |
| • | You can monitor the Blanket Orders List to decide when a release is appropriate. |
You may not delete or add line items in this selection. A release contains all the line items on the blanket order, no more and no less. If you wish to add or delete lines, do so using Change purchase orders before entering the release. If you want to skip receiving a particular line item on this release, you may enter a zero Quantity to release for that line item.
Select
Enter from the Releases menu.
The following screen appears:
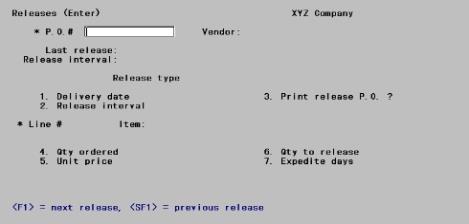
The same screen serves for both header and line item information. The two unnumbered fields, P.O.# and Line #, mark the beginning of the header and line item portions respectively.
From this screen, you can work with new and existing entries. Either of these may be an add entry or a change entry.
For a new entry: to add a new release
The cursor moves through Fields # 1 through 3, requiring entry at each field. The cursor is then positioned at Field number to change ?.
When you have no further changes to the header information, each line item is displayed in turn. You must enter a quantity to release, and you may change the other line item fields. You do not control the order in which the line items are presented, and may neither add nor delete a line item.
For a new entry: to change the current release
The cursor is positioned at Field number to change ? and you are allowed to change Fields # 1 through 3 (the header information). You cannot delete the release. When you have no further changes, you are positioned at Line # and can change the line item(s) if desired, selecting them individually in any desired order.
For an existing entry (either type)
The cursor is positioned at Field number to change ? and you are allowed to change Fields # 1 through 3 (the header information), or to delete the entry When you have no further changes (and have not deleted the entry), you are positioned at Line # and can change the line item(s) if desired, selecting them individually in any desired order.
Enter header information as follows:
* P.O. #
Enter the number of the blanket purchase order for which you want to add (or change) a release.
The purchase order must have been entered and posted in Purchase orders, but not yet closed. Closed purchase orders can be reopened if necessary to accommodate unexpected late receivings, but not new releases.
If an unposted change purchase order exists for a blanket order, you cannot enter a release for that blanket order until the change purchase order has been either posted or deleted. Conversely, you cannot use Change purchase orders for a blanket order when an unposted release is pending for that blanket order.
Options
If selecting an existing release, you may use one of the options:
|
<F1> |
For the next unposted release (for any blanket purchase order) |
|
<SF1> |
For the previous release |
Note that what you enter into this field (purchase orders) is not the same thing (releases) that you scan for with the option keys.
|
Format |
15 characters |
|
Example |
Type 17 |
If there is an existing entry for this purchase order (whether to add a new release or change the current release), the information for that entry displays and the cursor moves to Field number to change ?.
Last release
This shows the most recent release number and release date for this purchase order.
| • | If you have not specified a First reqd date for the purchase order, and if there have been no releases yet, this displays as NO RELEASES YET. The release you are about to enter will become release # 1. |
| • | If you entered a First reqd date for this purchase order, release # 1 was automatically entered (but not posted) when you posted the purchase order, and the first required date became the release date for release # 1. |
| • | In either event, each subsequent release increases the release number by one. |
This field displays automatically and may not be entered.
Release interval
This shows the release interval for the last release, if there is one. If there isn’t it displays as 0.
This field displays automatically and may not be entered.
Release type
Since a release is identified by a combination of purchase order number and release number, you might expect that you would enter the release number at this point. This is not necessary, because only one unposted entry can exist at any one time.
Instead, enter a code for the release type:
|
1 |
Add a new release. |
|
2 |
Change the last release. This option is not available if there has not been any release yet (which can only happen if First reqd date is blank). |
When a valid option is selected, the release type and change number are displayed.
|
Format |
Either 1 or 2 |
|
Example |
Type 1. Notice that ADD NEW RELEASE - # 2 displays. (Release # 1 was automatically created when you ran the Purchase orders / Post selection). |
The screen now appears as follows:
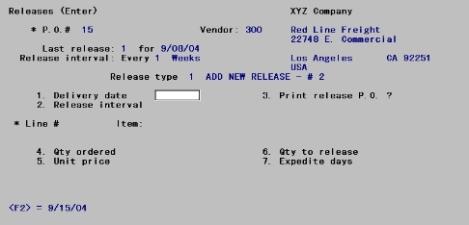
Enter the following header information:
1. Delivery date
Enter the date on which you want this release delivered to you, press <F2> to use the delivery date calculated from the blanket order’s release interval and the delivery date of the previous release.
|
Format |
MMDDYY |
|
Example |
Press <F2> |
2. Release interval
The cursor does not normally move to this field, since the release interval is usually defined when the purchase order is entered and does not change thereafter. You can change the existing release interval from Field number to change ? (in which case your new entry becomes the default for future releases).
|
Format |
99 |
(for the interval) |
|
|
D, W, or M |
(for days, weeks, or months) |
|
Example |
In this example the cursor does not move to this field. |
|
3. Print release P.O. ?
You have the choice of printing or not printing a separate release purchase order for this release of the blanket order. If you enter Y, you must print the release purchase order before you can post it.
Enter N if you do not need to print a purchase order for this release transaction. This would be the case when you verbally notify the vendor of the release but do not send him a printed purchase order.
|
Format |
One character, either Y or N. The default is Y. |
|
Example |
Press <Enter> for Y |
Field number to change ?
Make any needed changes to Fields # 1 through 3 (the header information).
Upon pressing <Enter> with this field blank, you are ready to enter line item information. The screen now appears as follows:

Note that the header information continues to display in the upper portion of the screen as each successive line item is displayed in the lower portion.
For an existing entry
You are positioned at Line # and can then select the line item to be changed. The information for that line on the existing entry displays on the screen and can be changed from Field number to change ?.
For a new entry: to change the current release
You are positioned at Line # and can then select the line item to be changed. The information for that line on the existing release displays on the screen and can be changed from Field number to change ?.
For a new entry: to add a new release
For each line item the line number displays automatically. The information for that line on the blanket purchase order displays on the screen. The cursor moves to Field # 6 for entry of the quantity to release. The cursor then moves to Field number to change ?, allowing change to any field on the line item (not just # 6).
Enter line item information as follows:
Line #
These are sequential line numbers beginning at one and increasing by ones (not the sequence numbers originally entered when you created the purchase order, which usually begin at ten and increase by tens).
If this is a new entry to add a new release, this field displays automatically.
Options
Enter the number of the line you wish to change, or use one of the options:
|
<F1> |
For the next line item of this release |
|
<SF1> |
For the previous line item |
|
Format |
999 |
|
Example |
In this example this field displays automatically because this is a new release. |
Item #
The item number and its description appear automatically and may not be changed:
| • | If you are interfaced to I/C, this is your item number and description, from Items. |
| • | If you are not interfaced to I/C, this is the vendor’s item number and description, from Vendor items. |
| • | Whether interfaced to I/C or not, a miscellaneous item displays with MISC as the item number. |
4. Qty ordered
This is the overall blanket order quantity for the line item, established when the purchase order was entered. You can change this, provided you do not reduce it to less than the quantity already released (or already received, whichever is smaller).
Any change to this field applies to subsequent releases as well as to the current one.
Unit costs must be entered in terms of the unit displayed at the right of this field, which is:
| • | Your stocking unit, if you are linked to I/C and this is not a miscellaneous item. On the printed release, the quantity will be converted into the vendor’s selling unit. |
| • | The vendor’s selling unit, in all other cases. |
Releases (unlike Receivings) does not allow you a choice of units. You cannot for instance enter the Qty ordered in terms of the vendor’s shipping unit.
This may be the last release for this order (that is, the quantity released here plus the quantity already received may equal the quantity ordered). If so, upon posting the receiving for this release this line item, and perhaps the entire purchase order, will be closed.
| • | If you wish to keep the line item open, you should increase the quantity ordered at this point. |
| • | If you do not do this and the order is closed upon receipt of the quantity called for by this release, you will not thereafter be able to use Releases (Enter) for this order until you have re-opened the order (via Change purchase orders). |
| • | Unilaterally extending the blanket order does not of course obligate the vendor to honor the original price, so you should print a vendor copy (answer Y to Print release P.O. ?). |
|
Format |
99999999.99999 |
(if this line is for Inventory or Other) |
|
|
99999999.9 |
(if this line is for Jobs) |
|
Example |
The cursor does not move to this field and this example does not require you to change it. |
|
5. Unit price
This is the unit price for the item per the blanket P.O. Changing the unit price here will also change the line item’s unit price in the Blanket P.O. when the release is posted.
|
Format |
9999999.99999 |
(if this line is for Inventory or Other) |
|
99999999.9 |
(if this line is for Jobs) |
|
|
Example |
The cursor does not move to this field and this example does not require you to change it. |
|
6. Qty to release
Enter the quantity of the item you wish to release now. The new quantity to release and the quantity previously released cannot add up to more than the total blanket order quantity.
|
Format |
99999999.99999 |
|
Example |
Type 10 |
7. Expedite days
Enter the number of days before the new delivery date that this new release of the line item should be expedited. If you have no need to expedite this item, just press <Enter>
|
Format |
99 |
|
Example |
The cursor does not move to this field and this example does not require you to change it. |
Field number to change ?
Make any needed changes to Fields # 3 through 7. Upon pressing <Enter> with this field blank:
| • | If this is a new entry to add a new release, the next line of the blanket order (if there is one) displays and the cursor is positioned at Field # 5, Qty to release. |
| • | If there is no next line, the message No more items for this P.O. displays. Press <Enter> to terminate this release. |
Otherwise, you are positioned at Line # to select the next line.
Distribution
You need not change the distribution amounts for the line item, even if you have changed the quantity ordered or the costs. This will be done in A/P Payables.
If you want to change distribution account number (or job, if the purchase order is for job use), do so through Changes to Purchase Orders before you enter this release.
This function lets you review the releases you have entered, in preparation for posting them to the permanent purchase order data.
See a sample Releases Edit List in the Sample Reports appendix.
Select
Edit list from the Releases menu or Releases edit list from the Reports menu.
The following menu appears:
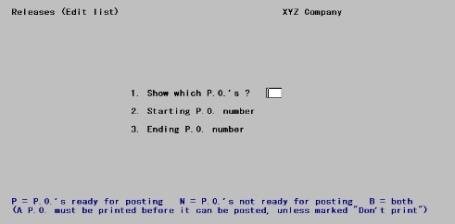
1. Show which P.O.’s ?
Enter your choice from the following:
P To show only releases ready to be Posted
N To show only those Not yet ready to be posted
B To show Both (all releases).
A release is ready to be posted if the release purchase order has been printed, or if the release was marked N earlier at Print release purchase order ?.
|
Format |
One letter from the list above |
|
Example |
Type B |
2. Starting P.O. number and
3. Ending P.O. number
Enter the range of purchase orders to show on the list. Follow the screen instructions.
|
Format |
15 characters |
|
Example |
Press <F2> at both fields |
Field number to change ?
Make any needed changes. Upon pressing <Enter> with this field blank, the Releases Edit List will print.
This selection allows you to print purchase order releases on either preprinted forms or on plain paper. A release looks exactly like a purchase order except for the heading, THIS IS RELEASE # nnn OF BLANKET ORDER # nnnnnn.
Select
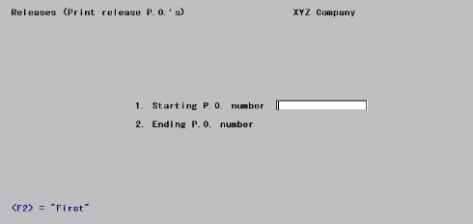
Print release P.O.'s from the Releases menu.
You must print a release purchase order before the release can be posted, unless you answered N to Print release purchase order ? earlier. If you change a release purchase order after it is printed, you must print it again before it can be posted.
The following screen appears:
Enter the following information:
1. Starting P.O. number and
2. Ending P.O. number
Enter the range of purchase orders to show on the list. Follow the screen instructions.
|
Example |
Press <F2> at each field |
Field number to change ?
Make any needed changes. Upon pressing <Enter> with this field blank, the release purchase orders will print.
If you are using preprinted forms, insert your forms into the printer in preparation for printing the release purchase orders. The prompt, Please mount purchase order form on printer. Type “done” when ready. If you are not using preprinted purchase order forms, this message does not appear. You may skip this if you are using a Company information PDF printer or Windows printer and the form is set up in Control information. See the Purchase Order Control Information chapter.
PDF Purchase Order Generation
When you print the purchase order with a Company information -PDF- printer, the program generates a PDF file for each new purchase order in the PDFFIL\PURCHASEORDERS directory. The name of each file will momentarily display on the screen as it is being created. An example of the P/O PDF file name is xx_POR_100_001113.PDF. The xx indicates the company number. The POR means it is a purchase order release. The ‘100’ is the vendor number and the ‘001113’ is the purchase order number.
You may also print and generate PDF files simultaneously using a -PDFP- printer.
Viewing and Emailing Purchase Orders
Because many files could be generated, they will not display during the print selection process. However, you may view the generated PDF files from the Ctl menu selection Email/view printed PDF's, located under the main menu selection PDF form file processing by using either Adobe™ Acrobat™ and Adobe Reader™. For user information on using the PDF form file processing features, see the PDF Form File Processing chapter in the System documentation.
From that same menu selection you may also email PDF files. To setup emailing see the appendix Email Configuration in the PBS Administration documentation.
When all blanket purchase order releases are ready to be posted, post them here.
See a sample Releases Register in the Sample Reports appendix.
Select
Post from the Releases menu.
You are asked whether releases are OK to post. Answer Y if they are ready to be posted or N if they are not. If you answer Y, the Releases Register is printed.
After the register is printed, the blanket purchase orders in the permanent purchase order files are updated with the information on the release entries.
If any release could not be posted, you are informed that no posting (of any release) has occurred. Refer to the register (which is printed anyway) for the reasons, then correct the problem and repeat this selection.